-
Crayons on Canvas
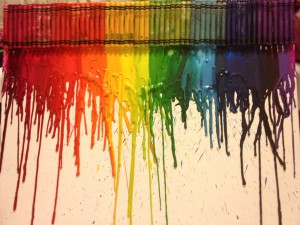
Posted on January 18, 2012 by The Foust Girls in We Did It!.We saw this pin on Pinterest that we thought was just beautiful and so we set out to make one ourselves. The first one we wanted to make black and white to match my bedroom. It turned out so-so, (more on that another time) but we did learn a lot from the experience and we decided to do a rainbow one next.
Here are our results:
You will need:
- Canvas
- Crayons
- Blow Dryer
- Hot Glue Gun
- Someone to hold it while you heat it, or some way to prop it up.
Steps:
- On your canvas lay out your colors. We had one box of 64 and two boxes of 48 so we could get plenty of our favorite colors.
- Once you get them all laid out and you know how many you need, begin hot gluing them on. You need to put a line of hot glue on the canvas about as long as half the crayon. Trust me when I say you don’t want to hot glue the crayon itself. That only ends in sore fingers. We wanted to remember what colors we used so we turned the Crayola part back against the canvas and displayed the colors. You could do it however but I think it probably needs to all be one way or the other.
- Once they’re all glued on you need to take the hair dryer on HOT and SLOW and begin warming up the crayons. It happens fast. You should be angling the hair dryer down from the top or the hair dryer will blow the freshly melted wax all over the place. It looks kind of neat when it happens sometimes but we didn’t want our whole thing to look like that. You can even put the hair dryer right against the paper wrappers and just adjust the canvas to make it run as fast or slow or where you want it.
We have tips for you:
- Use Crayola crayons. We tried CraZArt ones the first time and they melted too clear and quickly.
- Keep the wrappers on. Our first one we took it off and then the blow dryer blows the wax all over the place and the area under the crayons ends up empty even if you are careful. If you do take off the wrappers, then you can use a micro torch instead of a hair dryer. It’s funner and it’s faster, but it is also more dangerous and needs a buddy system so you don’t burn the house down.
- Don’t be afraid to adjust the angle of the canvas while you are working on it. Sometimes it wants to run where it shouldn’t and you have to make it go where you want. Gravity will help.
That’s it! I hope that you enjoy this and that you try it yourself. It isn’t too expensive and it is very impressive. Our 17 year old brother was even impressed with it and he’s not really into anything artsy.
Cheers!
Elle :-)


This was a lot of fun. I want to get more canvases and do more.
Very creative! Love the blog!!
I have this pinned on Pinterest. I have been wanting to try it! It’s fun to read a post from someone who actually did it. Great tips! Well done post, Elle.